Saturday 27 August 2016

Apricot Yogurt Chiffon Cake

I couldn't agree more with Zoe of Bake for Happy Kids that this yogurt cake is "light and spongy and it tastes a little like smooth and milky cheesecake"  I must say that this cheesecake-like yogurt chiffon cake with tangy apricot is SO SO SO good to eat !

This is not the first time I baked chiffon cakes with added dried fruits like cranberry, raisins etc. But I seldom add dried fruits for my chiffon cake as I find it difficult to make a neat and nice cut due to bits of fruits.  Perhaps to chop/mince the dried fruits finely may help.  First time I incorporated yogurt in chiffon cake recipe and I simply love the cheesecake-like soft and light yet fine crumbs texture.


Recipe source & adapted from :
Bake for Happy Kids
Cookpad

Apricot Yogurt Chiffon Cake
17cm chiffon pan
Ingredients :
For the yolk mixture
4 egg yolk
30g canola oil
35g caster sugar
1 teaspoon lemon juice
100g plain yogurt
1/4 teaspoon salt
80g cake flour (sifted)

For the meringue
4 egg white
1/4 teaspoon cream of tartar
35g caster sugar

30g dried apricot  (finely minced in small pieces and coat with 1 tablespoon cake flour)

Method :
1) Coat the dried apricot with 1 tablespoon of cake flour. Sift to remove any excess un-coated flour. Set aside.

Separate the eggs into yolks and whites. (the size of my egg is 65g each with shell)

2) Position the rack in the lowest level and preheat oven to 170°C.

3) In a clean mixing bowl, whisk the cold egg whites and cream of tartar till foamy using the electric stand mixer. Gradually add in caster sugar in 3 separate additions and beat till stiff peak, formed into a firm meringue. Transfer to a big bowl and chill in the fridge.

4) In the same mixing bowl, cream together egg yolks and caster sugar until pale and thickened using the electric mixer (about 3 - 4 minutes). Add canola oil and lemon juice and continue beating till combined.  Next, add the yogurt and whisk until the mixture is combined.

5) Sift in cake flour and salt and whisk again until mixture is well combined.

6) Gently but quickly fold 1/3 of the meringue into the yolk mixture with a spatula. Fold the remaining meringue in 2 batches into the mixture until it looks evenly mixed (no streaks of meringue).

7) Stir in the flour-coated dried apricots into the batter with a spoon. Pour the batter into the un-greased chiffon pan. Lightly tap the pan a few times on a table top to get rid of any trapped air bubbles in the batter.

8) Bake in a preheated 170ºC for 10 mins. Reduce to 160ºC and continue baking for 25 mins or until the cake surface turns golden brown, and a skewer inserted into the centre comes out clean.
Cover with a piece of loose foil over the pan if top of the cake is browning too quickly.
(Note: The temperature of the oven may vary, do adjust accordingly and observe especially in the last 10 - 15 minutes of baking.)

9) When the pan was removed from the oven, I used the suggested technique to drop the pan at a height of 20~30cm onto a table top. This action helps to keep the springy texture of the cake when it is left to cool.

10) Immediately invert the pan to cool before unmoulding the cake from pan.
*note: to unmould the cake:
a) Run a thin-bladed knife or palette knife around the edge of the pan and the funnel. Release the cake and run the knife along the base of the pan to remove the cake.
Or
b) By hand, gently pull cake from the sides of the tube pan. Turn the cake pan over and press down on the bottom firmly to dislodge.  Gently pull the cake from the base around the edge and around the whole cake. Continue to lift up the cake and moving inwards until you reach the tube.
Yeah !!! first time I unmould a chiffon cake with bare hands ! Thanks to Susanne of Loving Creations for You for the video tutorial on how-to unmould chiffon cake by hands.


Yeah ! I could unmould the cake with bare hands!
So fluffy !


the texture is so light and spongy ... so, are you convinced?

Here's how I enjoy slices of soft and spongy cheesecake-like yogurt chiffon cake with bits of tangy apricots over a cup of coffee black :)

Go bake this spongy cheesecake-like yogurt chiffon cake if you have not baked one before !
Enjoy & Happy baking !

Thursday 25 August 2016

Lemon Curd with Mixed Berries

Ever wonder what to do with some leftover lemon curd that's been idling in the fridge?  Well, simply spread it over bread or dip some crackers and finish it off. But I remembered I'd ever made easy Honey Cranberry Yogurt, so I turned these tangy creamy lemon curd into cold parfaits-kinda desserts. Top with graham cracker crumbs or any biscuits/cookies/granola that you could find in the pantry.

Lemon Curd with Mixed Berries
Serves 2


Recipe for making lemon curd here
Ingredients :
65g blueberries
65g strawberries, hulled and diced
4 - 5 teaspoons graham cracker crumbs
(put crackers inside Ziploc bag, sealed and crush them to crumbs)
Two 220ml containers or glasses

To assemble :
Spoon 2 tablespoons of chilled lemon curd into a 220ml container.

Top serving with about 2 tablespoons of mixed berries.

Repeat a layer of lemon curd and top with 2 teaspoons cracker crumbs. Garnish with whole strawberry.

Keep refrigerated.

This is so easy to assemble and tasted tangy refreshingly good served as aftermeal desserts.

Sunday 21 August 2016

Apricot Lemon Biscotti


Do you enjoy biscotti? I simply enjoy dunking crunchy & nutty biscotti in coffee.

Not sure why ... just hoping that the month of December will arrive any time sooner.  And biscotti is always my first edible homebake Christmas gift that I will associate with in the festive season. When I have the time to spare, I'll be in the mood of 'biscotti therapeutic baking' to bake some as giveaway gifts, some flavors  hereherehere & here

Have craving for biscotti today ...  baked a small batch of Apricot Lemon Biscotti, recipe adapted here with slightly tweaked a little in the ingredients
Apricot Lemon Biscotti
 Ingredients
 1 egg
 50g caster sugar
 1 teaspoon lemon zest
 150g plain flour
 1/4 teaspoon baking powder
 2 teaspoons lemon juice
 6 dried apricots, finely chopped
 30g almond lightly toasted and coarsely  chopped

Method
Step 1
Preheat oven to 180°C. Position the rack in center of oven. *Note : The temperature of the oven may vary, do adjust accordingly.
Line a large baking tray with baking paper. Set aside.

Step 2
Using an electric mixer, beat egg, sugar and lemon zest until thick and pale. Add in the lemon juice and continue beating till combined.  Sift over flour and baking powder. Add almond and apricots. Stir to combine with a spatula.

Turn out onto a lightly floured surface. Knead lightly until smooth. Shape into a 20cm long log. Place on prepared tray. Flatten slightly.

Step 3
Bake for 30 minutes or until golden. Cool on tray for 15 minutes.


Step 4
Reduce oven temperature to 140°C.

Gently transfer the log onto a cutting board. Using a serrated knife, slice log diagonally into 5mm-thick slices. I reused the baking paper. Place slices, in a single layer, on baking tray. Bake for 20 to 25 minutes, turning halfway through cooking, or until dry and crisp. Stand on tray for 5 minutes. Transfer to a wire rack to cool completely.


Can be stored in an airtight container for a week.


Enjoy !

Sunday 14 August 2016

Cream Cheese Pound Cake

Because of its richness in butter, I seldom bake pound cakes or butter cakes.
According to  wikipedia  :The traditional pound cake refers to a type of cake traditionally made with a pound of each of four ingredients: flour, butter, eggs, and sugar.

But it's been a long time since I've last baked a cherry lemon pound cake or rich butter cake.  Now, got some leftover cream cheese in the fridge and not knowing what to do with it.  Decided to bake this  ... butter + cream cheese = extra-rich pound cake ! (How am I  gonna shed my extra pounds ... Ha ha!)


Recipe source : Martha Stewart
Below my slightly modified version as I've scaled down to about 1/3 recipe and reduced the sugar quantity.

Ingredients
126g all-purpose plain flour
3/4 teaspoon baking powder
2 eggs (the size of my egg is 60g each with shell)
100g caster sugar
113g salted butter, softened
113g cream cheese, softened
2 teaspoons vanilla extract

Method :
1) Preheat oven to 180°C. Position the rack in center of oven. Note : The temperature of the oven may vary, do adjust accordingly.
Sift together the plain flour and baking powder and set aside.

2) Butter (or spray with a non stick vegetable spray) a 4x8-inch loaf pan.

3) With an electric mixer or hand mixer, beat butter and cream cheese in medium speed until smooth. Gradually add caster sugar in 2 additions, beat for about 5 minutes until light and fluffy.

4) Next,  add the eggs, one at a time, beating well after each addition. Mix in vanilla. Scrape down the sides of the bowl with a spatula. Adjust the mixer on low speed, add in the flour and beat until just combined.

5) Pour batter into prepared pan and gently tap the pan a few times on table top to release the trapped bubbles in the batter. Bake for 40 - 45 minutes, or until cakes are domed, nicely browned. If the cake seem to be browning too quickly, tent with a sheet of aluminium foil. Check for doneness with a skewer or toothpick inserted into the center of the cake if it comes out clean.


6) Cool the cake in pan for about 10 minutes before turning out onto a wire rack to cool completely.

Feel free to dust with icing sugar or glaze the pound cake if you like.  But I'm enjoying few two slices as it is ... love this nice golden brown crust, extra moist with fine crumbs and a hint of buttery fragrance. Yeah consume in moderation :)


Saturday 6 August 2016

Lemon Yogurt Mini Bunny Cubes


Have you ever thought of baking mini cakes or muffins using Origami instead of the usual ready store bought muffin or cupcake liners? I’m sure you will love these mini DIY cakes using Origami technique. 

When my kids were young (probably age 4 to 6), we loved spending our leisure time in folding Origami together. Click here to find out about Origami.  With the tutorial instructions given on the book, it was not too difficult to use colourful Origami papers to fold simple shapes like heart, boat, flowers to slightly complicated steps for cute animals/insects like cow, dog, cat and butterfly, dragonfly etc.  Sometimes we would fold simple shapes and pasted them on DIY birthday cards for their kindergarten friends. 

Ever since they have grown up, we hardly … or rather, never make Origami together.

Inspired by Parchment Bunny Cubes the bunnies were folded in Origami, I lay my hands on Origami again … to have some fun in baking mini cakes with DIY parchment paper folded like bunny. I tried out just 4 …. Cut the size of parchment paper 20cm x 20cm.  Refer here for folding balloon rabbit 

Since we like loved the fragrant Rosemary Lemon Yogurt Cake, and easy to bake ... I modified slightly to make as mini cakes.

Lemon Yogurt Mini Bunny Cubes 
Make 7 mini cakes (3 cupcakes & 4 Origami bunny cubes)
Ingredients A
65g caster sugar
125g yogurt
3 tablespoons canola oil
1 egg
1/2 teaspoon vanilla extract
2 tablespoon freshly squeezed lemon juice
1 teaspoon zest of lemon

Ingredients B
100g self-raising flour (sifted)
1/4 teaspoon baking soda
Pinch of salt

Method:
1) Position the rack in the center and preheat oven to 190°C.

2) Put all the ingredients A in a medium size mixing bowl and whisk together until incorporated.

3) Add in the sifted flour and the rest of ingredients B to the mixing bowl. Whisk until no lumps remain. Pour the batter into piping bag, pipe through the small hole (nose) to about slightly more than half for the bunny.  Fill the cupcake liner to about ¾ full.  Place all onto a baking tray.

4) Bake for about 25 minutes. Check for doneness with a toothpick inserted into the center of the cake if it comes out clean.


5) Transfer the bunny cubes and muffin cups to wire rack for cooling.  Serve warm if you like.

Note :
1) I made a slight mess on the spilled batter around the "nose". So I thought to 'camouflage' the unslightly stain by covering it with mini chocolate chip. It didn't help as it  become dark and clearly visible. I should have wiped clean the pipping nozzle.

2) The temperature of the oven may vary, do adjust accordingly.


I'm sure this Origami Bunny cubes will be a fun & crafty DIY baking-together with young children ^-^!

Enjoy and have fun in Origami baking !


Thursday 4 August 2016

Peach & Cream Cheese Muffins


It was raining heavily outside when baked some muffins.  So timely to serve those freshly baked muffins on the plate which printed "Rainy Day" that I had bought from Daiso :)


Recipe adapted from :
Baking Equals Love
Below my slight modification made in using self-raising flour, replaced apricot with peach and reduced the quantity of some ingredients.

Peach & Cream Cheese Muffins
Makes 9 muffins

Dry ingredients A
160g self-raising flour (sifted)
1/2 teaspoon salt
90g caster sugar

Wet ingredients B
100 ml fresh milk
50g canola oil
1 large egg
1/2 teaspoon vanilla

5 peach halves (canned peach), drained
60g - 70g cream cheese diced into 9 cubes

Method :
1. Position the rack in the center and preheat oven to 190°C. (The temperature of the oven may vary, do adjust accordingly).
Place 9 cupcake liners in a 12 cup muffin tray, set aside. Or you could just use muffin cups.

2. Drain the peaches, give a brief rinse and pat dry with kitchen towel. Dice 3 peach halves and set aside. Slice 2 peach halves into slices to decorate the batter top. 

3. Dry ingredients : Combine all the dry ingredients in a large bowl and whisk briefly. Make a well in the centre.

4. Wet ingredients : In a large measuring jug or bowl, whisk all the wet ingredients B. Pour the mixture in the dry ingredients and fold gently with a spatula a few times to combine. Add the diced peaches and fold in quickly and gently until only just mixed. Do not over mix. The end result of over-mixing is a tough texture.

5. Spoon the batter into the baking cups using an ice-cream scoop. Fill about 3/4 full. Gently push each cubed cream cheese into the middle of each muffin, making sure the cream cheese is covered by muffin mixture.  Place a slice of peach on top.

6. Bake at 190°C for 22 - 25 minutes. Remove the muffins from the tray and transfer to a wire rack to cool. Serve warm and best eaten warm on the day of baking. If unable to consume all within the day, refrigerate the muffins in air-tight container and warm it up the next day.


The texture of most muffins are usually dense and some drier but these muffins turned out slightly moist and fluffy.  I absolutely enjoy this kinda fruity cheesy muffin ... a slightly crisps crust with light fluffy soft texture.  More so with a cup of hot coffee on a rainy day :)

Hope for more sunshine for the coming weekends.  Happy Baking :)

Tuesday 2 August 2016

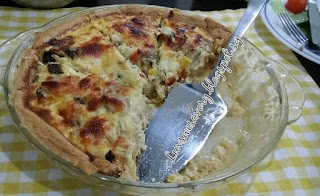
Chicken Mushroom & Ham Quiche

When was the last time I'd baked a quiche?  .... Couldn't recall when was the last time ... but I think I've baked it once last year.

I've made many times of mini quiches in Year 2014, replicated from the recipe here with different choice of fillings.

Decided to bake a big savoury quiche (25cm pie dish) for our weekend lunch. Realised that my "pie skills" had turned rusty :( .... should have rolled the pastry dough thinner.

Big kids were delighted a big fragrant quiche was served for lunch. ... hee... hee ... perhaps they really missed mom's "signature dish" ? LOL


Chicken, Mushroom & Ham Quiche
Makes one 25cm pie dish (serves 6 - 8 pax)
Ingredients :
Quiche filling
1 tablespoon finely diced onions
120g shredded cooked chicken
3 slices ham, diced
4 - 5 pieces shiitake mushroom, diced
50g corn kernels
3 eggs, lightly whisked
100ml whipping cream
100ml fresh milk
40g grated Cheddar or Mozzarella cheese

Short crust pastry
225g multi-purpose plain flour
125g cold salted butter, cut into small pieces
50ml ice cold water

Method:
Prepare the short crust pastry first.
Sift flour in a large bowl.
Cut cold butter in small cubes or pieces, pour into flour. (Depending on the weather, if warm, freeze the cut butter for about 4 - 5 minutes). Blend into the flour mixture with a pastry blender or fingertips (not palm) using rub-in method till crumbly consistency like coarse crumbs.

Add in water to the flour mixture and mix to desired consistency until it forms a soft ball. Flatten the dough slightly into a round disc, cover with plastic wrap.  Refrigerate for about 30 minutes or just until firm.

Lightly grease the pie dish with some butter and set aside.

Position the rack in the center and preheat oven to 180°C. (The temperature of the oven may vary, do adjust accordingly).

On the lightly flour surface, roll out dough to about 3mm thick and fit into the prepared pie dish. Gently press dough to cover all the sides.  Rest about 5 mins before tidying the edge with a knife or scrapper.  Lightly prick bottom of pastry crust with the tines of a small fork.

Line the pastry with baking paper and fill with some dried beans or rice. Bake for 10 minutes. Remove the paper, beans or rice and bake for a further 10 minutes or until light golden.

Prepare the filling:
In a jug or bowl, beat egg, liquid and strain. Set aside.

In a big bowl, mix and combine all the ingredients (except the liquid).  Fill the pie base with ingredients (slightly 3/4 full).

Pour liquid into pie dish to 3/4 full. Top with some Mozzarella cheese and bake about 35 - 40 mins.


Note: 
1) The temperature of the oven may vary, do adjust accordingly, suggested 180°C - 200°C.

2) If prefer to make individual small quiches, divide the dough accordingly. Eg 25g for muffin size foil case.

Freshly baked ... loved the aroma buttery cheesy fragrance.  We definitely enjoyed things that we've yearned for .... Couldn't wait to tuck ourselves in ... Enjoy ! Happy baking, have a great week ahead :)