Tuesday 28 June 2016

Parsley Lime Rice with Mixed Herb Fish Fillets


My kids love butter fragrant fried rice and fried rice with egg & ham/sausage. These fried rice are very flavorful and they could eat a big plate.  Although I'm cutting down food rich in carbohydrate, oil and butter etc., still I don't want to deprive them from stable menu ... perhaps a healthier version. With lots of lime and lemon, fresh parsley and mixed dried herbs in the kitchen, I tried out this citrus flavor of lime juice mixed with cooked rice.

When I was mixing the cooked rice in the saucepan with lime juice, the aromatic citrus and parsley fragrances really made me salivating.

To pair with this tangy rice, I made some pan fried herb fish fillets in extra-virgin olive oil.


Recipe source/reference : Food.com
Below my modified version and served with pan fried fish fillets.

Parsley Lime Rice with Mixed Herb Fish Fillets
Serves 2 - 3 persons
Ingredients
2 cups of cooked Jasmine white rice (feel free to substitute with brown rice)
Juice of 2 big limes
1 bunch of chopped fresh parsley leaves (about 1.5 to 2 tablespoons full)

For the fish fillets:
2 large fish fillets (about 250g)  - cut into big chunks
1 teaspoon mixed dried herbs
1 teaspoon salt
Pepper to taste

1 - 2 tablespoon Extra-virgin olive oil for pan frying the fillets.

Method:
Cook the rice with rice cooker.

Pat dry the fillets with kitchen towels.
Season the fillets with mixed herbs, salt and pepper. Set aside and let the seasoning set in about 30 minutes.

Heat a non-stick pan with medium heat. Add 1 tablespoon Extra-virgin olive oil and pan fried the fillets 2 - 3 minutes on both sides, lightly browned.

In a saucepan over low-medium heat, combine the cooked rice with fresh lime juice and chopped fresh parsley. Quickly and gently mix well with a big wooden spoon for a few minutes.

Serve immediately, spoon the desire amount of parsley lime rice with some pan fried herb fish fillets. Squeeze some lime juice over the fillets if you like.

This new citrus flavor rice was very well received by my big kids.  Glad to enjoy a plate of fragrant tangy non greasy parsley lime rice. In future, I'll add some chopped lightly toasted walnuts or pine nuts to the rice :)


Thursday 23 June 2016

Orange and Parsley Salad


Do you like parsley?  I mean to eat a big bunch of fragrant parsley. .... Occasionally I would sprinkle a little minced spring onions, parsley on the food.  But my big kids don't appreciate such fragrances when they were young ... but now they do not mind just a little of them tossed with or sprinkle on food.

Chance upon this interesting recipe ... parsley and orange salad .... since I've got a bunch of English parsley in the fringe, so tried this for my dinner. Yes, I'm on a healthy diet to reduce some weight and cholesterol level :(

Recipe adapted from : Brooklyn Supper
Below my slightly modified version as I've omitted shallots and reduced the quantities.

Parsley and Orange Salad
serves 1
Ingredients :
1 bunch parsley, minced
1 shallot, minced (I omitted this)
1 big orange
1 to 2 teaspoons Extra-virgin olive oil
Pinch of salt & ground pepper to taste

Method
Peeled and cut the oranges in thin wedges.
Gently toss the oranges with the minced parsley. Drizzle in the olive oil, and sprinkle a pinch of salt and dash of pepper.
Set aside to allow the flavors and taste to immerse.

Simple and easy to make! So how does this salad taste like? Sweet oranges with fragrance parsley has a distinct flavor with a hint of light peppery taste.

Well, healthy eating for a healthier me ^-^!
Have a blessed weekend !


Monday 20 June 2016

Blueberry & Lemon Friands

My big kids love mini cakes.  Other than chocolate cakes, they love lemon zesty flavour cakes too.
Friands are quick and easy to make. However some recipes require the use of electric mixer (Fruited Friands which I attempted earlier this year). Regardless, most recipes I've come across do not require the use of electric mixer ... just a fork to beat the egg white, add and stir the wet ingredients to the dry ingredients :)  A muffin pan comes in just as handy if you do no have nice and dainty traditional Friand pan.


Recipe source : The Kiwi Cook
Below my slightly modified version as I've halved the recipe.

Blueberry & Lemon Friands
Yields 5 - 6
Ingredients :
25g all purpose plain flour
70g icing sugar (confectioner’s sugar) [think I'll cut down to 60g next time]
1 tablespoon lemon rind, finely grated
90g ground almonds
80g unsalted butter, melted and cooled
50g fresh blueberries
2 egg whites, lightly beaten with a fork
Icing sugar, to dust (optional)

Method :
1) Grease a 6-hole muffin tin with butter or cooking spray. (I don't have a friand pan, used a squarish muffin pan)

2) Preheat the oven to 180°C. Position the rack in the centre.
*The temperature of the oven may vary, do adjust the temperature and timing to suit your oven.

3) Melt the butter and leave to cool.

4) Sift the plain flour and icing sugar into a large bowl then add the lemon rind and ground almonds. Stir to combine evenly with a manual whisk and make a well in the center.

5) Add the egg whites and melted butter to the dry ingredients and stir gently until just combined; do not over-beat. Gently fold through blueberries with a spatula (don't over-mix or the batter will turn blue!).

6) Evenly fill about 3/4 in each greased muffin cup using an ice cream scoop. Bake for about 25 - 30 minutes until golden brown and just firm to touch. Check for doneness with a skewer/toothpick inserted comes out clean.

7) Leave in the pan for about 5 minutes before transferring to wire rack to cool.
Dust a little icing sugar or snow powder to beautify the cakes.


Something sweet and delicate for the afternoon tea break.  Love the slightly chewy crust with soft and light texture bursting of fruity blueberries in each mini cake.  Enjoy ! Happy baking and have a wonderful week ahead ^-^!

Thursday 16 June 2016

Banana Bread with Maple-Cinnamon Applesauce

Recently, my home is filled with big bunch of bananas … so I simply add some ripe bananas to bake banana breads or muffins. Although we love the moist and dense banana breads, one thing for sure I have to reduce the butter & sugar intake … for health reason.  I’m sure if you have ever baked banana breads (non yeast), you’ll know how to “mix and match” the ingredients like the types of nuts, substitute raisins with chocolate chips etc etc. Mash or chop your bananas in chunks, add some toasted coarsely chopped walnuts/ almonds and a pinch of ground cinnamon … would definitely make a loaf of aromatic and delicious banana bread.

Two weeks ago, I was happy to find an easy to bake recipe shared here,  But I am also very happy to find another recipe that doesn’t require butter or oil to give the moist and dense in the banana breads.  Glad to learn that "Applesauce offers the same consistency as butter or oil, but with zero fat, a little extra natural sweetness, and fewer calories ..."  Since I’d made some easy maple cinnamon applesauce, it came timely to bake this lighter version of nutty banana bread with a hint of cinnamon applesauce fragrance. No guilt to have a few slices at one go :) 


Recipe source :
News Health - Baking without butter or oil
Yields: 1 small loaf (I used a heatproof paper pound cake mould 7.5cm x 17.8cm x 5cm)
Ingredients A:
126g all purpose plain flour (sifted)
50g caster sugar
1/2 teaspoon baking soda

Ingredients B:
60g cinnamon applesauce (I used homemade maple syrup sweeten applesauce *see recipe below)
1 teaspoon vanilla extract
1 egg, lightly beaten
1 large ripe banana
60g chopped nuts (a mixture of walnuts & almonds, light toasted)

Method:
1) Position the rack in the middle and preheat oven to 180°C, spray loaf pan with cooking spray or lightly grease with low fat spread.

2) Lightly toast the nuts and set aside, chopped coarsely.

3) Mash the ripe banana with a fork, set aside.

4) In a medium bowl, combine the dry ingredients A.  Add in the ingredients B to A and mix with a rubber spatula or wooden spoon until well combined. Do not over mix the batter.

5) Pour batter into greased loaf pan and bake for 35 mins – 40 mins. Check for doneness with a toothpick inserted into the center of the cake if it comes out clean.

6) Let cool in pan for 5 mins and then cool bread on cooling rack.


To make the *Maple-Cinnamon Applesauce (recipe adapted from the cookbook EatingWell Fast & Flavorful Meatless Meals by Jessie Price & the EatingWell Test Kitchen) with my slight modification in blue.

Ingredients :
6 Mclntosh or other tart apples, peeled and cut into 1-inch pieces
2 Golden Delicious or other sweet apples, peeled and cut into 1-inch pieces
(I used a mixture of Gala & Granny Smith apples)
60ml water
2 tablespoons pure maple syrup
1/2 teaspoon ground cinnamon

Method:
Fill the large saucepan with water and all the apples.
Cook in medium heat and bring to a boil, then reduce heat and simmer.
Cover and cook, stirring once or twice, until the apples are very soft, about 25 minutes.
Mash the apples to the desired consistency and stir in maple syrup and cinnamon.
Cool, store in air-tight container and refrigerate for up to 2 weeks or freeze for up to 6 months.


Soft and nutty texture with a hint a cinnamon maple fragrance! 
Enjoy & Happy Baking !

Sunday 12 June 2016

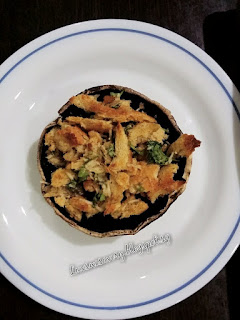
Roasted Portobello Caps

My big kids love to indulge stuffed grilled/roasted cheesy mushrooms whenever we dine out at some western restaurants that served as appetiser. But I always find that those stuffed grilled/roasted mushrooms are often stuffed with "high-fat" ingredients (eg. bacon, loaded with cheese and butter etc.).

Love this full of flavor "gigantic" stuffed mushroom yet without all the high-fat ingredients.  Most of all, a fuss free and easy to prepare dinner on busy weeknight.

Roasted Portobello Caps
(adapted from the cookbook EatingWell Fast & Flavorful Meatless Meals by Jessie Price & the EatingWell Test Kitchen)
Below my slight modification made in blue.
Ingredients:
4 large portobello mushrooms, stems removed
1/4 teaspoon salt (to sprinkle a little on mushrooms and remaining for stuffing mixture)
Ground pepper to taste

To make the stuffing mixture
15g breadcrumbs (I toasted 2 slices of wholemeal bread and crushed coarsely)
2 tablespoons grated Parmesan cheese
1 tablespoon extra-virgin olive oil
1 tablespoon minced fresh parsley

Cooking spray for the pan (I used olive oil)

Method :
1) Preheat oven to 220 °C.  Lightly grease a baking sheet or roasting pan with a little olive oil.

2) Remove the stems of the mushrooms, place gill-side up on to the prepared pan.  Sprinkle with a little salt and pepper on each mushroom. To roast for about 20 minutes or until soft.

3) While the portobello mushrooms are roasting in the oven, prepare the stuffing mixture. In a bowl, combine and mix well the remaining salt, pepper, breadcrumbs, olive oil, Parmesan cheese and fresh parsley.

4) Remove the tray of roasted mushrooms from the oven. Spoon 2 tablespoonful of mixture onto each mushroom cap.  Return the mushrooms to the oven and continue to roast for about 5 minutes or until the breadcrumbs are nicely browned.


I was too lazy to grind the toasted bread to make breadcrumbs ... toasted 2 slices of wholemeal bread and crushed them coarsely ... hee... hee ... my big kids thought mushroom stuffed with grilled chicken meat.  As usual, they complained "not enough cheese ...". Okay will top with more grated cheese for them when I make roasted portobello caps again.  But this is definitely my kinda light and delightful dinner, paired with a bowl of green leafy salad and slices of fruits. Enjoy !

I would like to share this delightful recipe and linking this post with :


Tuesday 7 June 2016

Oatmeal Honey Rolls

I've got an opened pack of rolled oats sitting in the pantry and moving rather slowly.
Chance upon this recipe King Arthur Flour Oatmeal Bread and definitely it comes in timely to help reduce the inventory :)
But I wasn't keen to bake a loaf of bread cos we had just finished the loaf of store bought white bread. So scaled down the quantity to make some buns instead. I remembered my big kids liked the honey glaze Honey Bread I baked previously. So I baked the buns glaze with honey and oats topping.


Recipe adapted from King Arthur Flour Oatmeal Bread
Below my slightly modified version as I've scaled down the quantity.
Oatmeal Honey Rolls
Yields 12 rolls
Ingredients :
270g Bread Flour
60g rolled oats
25g unsalted butter (softened)
1 teaspoon salt
1.5 tablespoons honey
1.5 teaspoons instant yeast
210g lukewarm milk (to use 190g - 210g depending on texture)

Topping
1 tablespoon honey
1 teaspoon of canola oil
15g - 20g rolled rolled oats to sprinkle

Method
1) Heat the milk to lukewarm in a small pan.

2) In a large bowl, combine bread flour, yeast, honey and rolled oats, add in the softened butter, salt with a spatula. Gradually pour in the milk and mix to form a shaggy dough. Lightly dust the hands with some flour and knead the dough by hand. Knead for about 10 minutes till it turns into a soft, smooth dough.

3) Place the dough in a lightly greased bowl, cover with a damp cloth or cling wrap and leave it in a warm place to proof until doubled in size, about 1 hour. (it'll become quite puffy, though it may not double in bulk).


4) To check if dough has doubled, lightly press down into center of dough with one finger. If indentations remain, knock back and punch the dough down. Divide the dough into 12 portions (about 45g each). Roll each piece into a ball, gently stretching the dough over itself and pinching together at the bottom. Place each roll seam-side down on a lightly greased pan or baking sheet. Cover with a damp cloth or cling wrap for 2nd proofing, about another 30 minutes.

5) Position the rack in the center and preheat oven to 180°C.

To make the honey & oats topping : mix canola oil and honey in a small bowl. Brush glaze over rolls and then sprinkle with some oats.
I made a few snips as thought to replicate
some petals shape but it didn't turn out well


6) Bake in a preheated oven at 180°C for about 15 - 17 minutes or until golden brown.

7) Let buns cool in pan on wire rack for 5 minutes. Remove the buns from pan to wire rack to cool completely.  Store leftovers in an airtight container, good for about 3 days in room temperature.


Freshly baked healthy Oatmeal Honey Rolls to enjoy for our afternoon break and morning brekkie.

Thursday 2 June 2016

Banana Bread

Super love this so nicely browned loaf bread ...  We can never get tired of bananas .... add them in muffins, cakes or sweet desserts (here, here, here & here just to share a few).  Besides, my big kids prefer bananas to more expensive blueberries or fresh figs, so there's no reason why "I should burn a big hole in my wallet" ... hee hee !

Okay, to bake this bread is so easy with no stand-mixer is needed and minimal washing of utensils.  "A fork to whisk the egg and a sturdy spoon to mix the batter ..."
So it saves my time ... I baked this on a week night for our next day's brekkie.


Banana Bread
Recipe adapted from Simply Recipes Banana Bread
Below my slight modifications made as I've reduced the amount in butter and sugar.
Ingredients
185g all-purpose flour
2-3 very ripe bananas, peeled and mashed
50g unsalted butter, melted and cooled
120g castor sugar
1 egg, lightly beaten
1 teaspoon vanilla extract
1 teaspoon baking soda
Pinch of salt

Method
1) Butter (or spray with a non stick vegetable spray) a 4x8-inch loaf pan.

2) Preheat the oven to 180°C. Position the rack in the middle. *Note : The temperature of the oven may vary, do adjust accordingly.

3) In a mixing bowl, mash the ripe bananas with a fork until you have a thick and smooth paste. Next, whisk in the melted butter, caster sugar, beaten egg and vanilla extract. Mix in the baking soda and salt.

4) With a big spoon, mix the banana mixture into the flour until just combined.  Pour the batter into the prepared loaf pan.

5) Bake until golden brown about 50 minutes to 1 hour in preheated oven or until a tester or toothpick inserted into the center comes out clean. 

6) Remove pan from oven, place on a wire rack to cool completely.

Told ya! Hassle free to bake this nicely browned, slightly crisp crust yet moist texture banana fragrance bread.
We love to slice them in thick slices :) Enjoy !


Enjoy !