Sunday 19 November 2017

Hokkaido Cheese Tart

Few weeks ago, my baking kakis ( baking buddies) and I attended an enjoyable tarts baking workshop.  We were taught to bake 4 tarts recipes and Hokkaido Cheese Tart was one of them.

Since my big kids loved Hokkaido Cheese Tarts, why not pratice what I've learned.  So baked some for our weekend snacks.


I adjusted the recipe a little ... instead of 200g cream cheese, I mixed with some mascarpone cheese.

Hokkaido Cheese Tart
Makes 9 alumimum cases size 79 x 18/20mm(H)
Ingredients :
For tart pastry
100g all-purpose plain flour
A pinch of salt
90g cold unsalted butter, diced
1 egg yolk
20g milk

For cream cheese custard
(A)
120g cream cheese
80g mascarpone cheese
30g unsalted butter
100g heavy cream
A pinch of salt

(B)
1 egg
65g icing sugar (reduce from 80g)
10g corn starch

(C)
1 tablespoon lemon juice
1 teaspoon lemon zest

Egg wash : In a small bowl mix 1 tsp milk and 1 egg yolk with a fork. Brush the rim of pastry shell and cream cheese mixture.

To make the pastry shell:
1) In a big bowl, combine the plain flour and salt, set aside.
In a small bowl, mix the egg yolk and milk with a fork.

2) Using finger tips, rub the cold butter into the flour mixture, until it resembles bread crumbs.

3) Pour in egg yolk mixture and kneading and mixing until a dough is formed. Form a flat disc and wrap the dough with clingwrap and chill in the frigerator for 30 mins. (Can prepare in advance and fridge overnight).
**while waiting for the dough to chill, you may proceed to make the cream cheese custard.

4) Take out the dough from the fridge. Preheat the oven to 180ºC. Position the rack in the middle.

5) Dust a working surface with some flour. Divide the dough equally. Mine is 22g each and press the dough into a tart mould or alumimum case. Prick the base of the pastry with a fork. Repeat with the remaining.  Brush the rim of pastry shell with egg wash.

6) Prebake pastry shells at 180ºC for 10 mins or until golden brown.  Remove from oven and place on wire rack to cool.

**To make the cream cheese custard :
Cook the cheese custard using bain marie method.

1) Combine all the ingredients (A) into a heatproof bowl. Half-fill a cooking pot with water and bring to a simmer. Set the heatproof bowl in the mouth of the pot and cook with low flame. Keep stirring the mixture with a whisk till everything is melted.

2) Once metled, add ingredients (B). Mix till well-blended, the mixture will thicken slowly. Add in ingredients (C). Mix well till smooth, off the flame and cool the cheese custard.

Transfer the cheese custard to a piping bag.  Pipe cheese custard into the cooled pastry shells. Chill in the fridge for about 20 - 30 minutes.

Preheat the oven to 210ºC. Gently brush the top of the cheese mixture with egg wash.  Bake for about 10 mins.

Done! remove from oven and place on wire rack to cool. Serve warm if you like.

Note :
The temperature of the oven may vary, do adjust the temperature and timing to suit your oven.
In my next attempt, I will reduce the cheese filling baking from 10 to 8 mins to yield more a gooey texture.

Freshly baked ! Enjoy warm fragrant Hokkaido Cheese Tarts with a cup of hot honey lemon tea. Yummi-li-cious!


Sunday 17 September 2017

Nutella Bundt Cake

Had not been baking cakes in the past 2 months.  Not even try picking up to bake some hassle free muffins on weekends.  No time to bake ?!  Well, just my excuses and excuses ... but I'm coming through in some hard times.  Ya, needed to sort out some personal things that had affected my emotion.

Well, glad I've managed to sort things out, a breeze to relax and enjoy a slice of warm buttery Nutella filled butter cake on a sunny afternoon.


Tweaked/adjusted from the previous bundt cakes recipe that I've attempted here 

Nutella Bundt Cake
Recipe:
Makes one 6-cup Bundt pan or one 8-inch cake pan.
Ingredients (A)
113g unsalted butter, at room temperature
1/4 teaspoon salt
90g castor sugar
2 eggs, at room temperature (the size of my egg is 60g each with shell)

Ingredients (B)
100g All-purpose plain flour
80g cake flour
1 teaspoon baking powder

Ingredients (C)
100g full cream fresh milk

4 - 5 tablespoons Nutella

Method:
Preheat the oven to 170ºC. Position the rack in the middle. The temperature of the oven may vary, do adjust the temperature and timing to suit your oven.

Combine Ingredients (B) in a medium bowl, sifted and set aside

Grease the 6-cup Bundt pan lightly with some *vegetable oil using brush or with kitchen towel, set aside.
(*or well-greased with butter and lightly flour)

In a clean mixing bowl beat together the butter, castor sugar, and salt until light and fluffy using an electric mixer on medium speed.

Add the eggs one at a time, beating well after each addition. Scrape down the sides and bottom of the bowl as needed.

With the mixer on low speed, add alternately the ingredients (B) & (C) starting with B (flour mixture in three additions) and milk (in two additions) [starting and ending with the flour mixture]. Mix well until just combined for each addition.

Pour half the batter into bundt pan and smooth the top. Next, spoon about 4 to 5 tablespoonfuls of Nutella and lightly spread evenly over the batter. Pour the rest off the batter in the pan, smooth the top.
*note: you could aslo make a swirl with a knife or skewer if you like. But I preferred the thick Nutella spread sandwiched in this bundt cake.

Tap the pan lightly on a table top a few times to get rid of any trapped air bubbles in the batter.

Bake the cake in preheated 170°C oven for 40 to 45 minutes.  Check for doneness, insert a skewer in the center if it comes out clean with a few moist clumps clinging to it. Do not over bake else it will be dry.


Enjoy!


Sunday 2 July 2017

Kueh Bakar Pandan


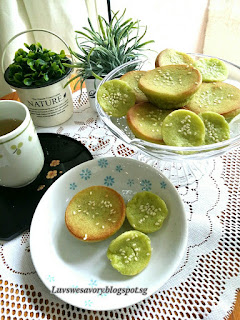
Not very often that I will make kuehs for our weekends snacks. On some rare occasions I will make the Pumpkin ondeh ondehBanana hoon kueh pisang when we feel like having these kuehs again.

So far, I've not attempted a baked version. I remembered a kueh recipe that's easy to make and filled with pandan and coconut fragrance. But as I do not have the Bahulu mould, I tried out on 1 floral aluminium mould but they turned out too small. I used the aluminium muffin cases instead.

Recipe adapted from :Joceline Butter Flour & Me
Kueh Bakar Pandan
About 15 - 17 small aluminium muffin cases.
Ingredients :
2 eggs
80g castor sugar
150g all-purpose plain flour
150g pandan juice
200g coconut milk
Pinch of salt
1 tablespoon vegetable cooking oil

Extra cooking oil to grease the aluminium cases.
1 tablespoon sesame seeds to sprinkle

Methods:
1) Preheat the oven to 180ºC. Position the rack in the middle. The temperature of the oven may vary, do adjust the temperature and timing to suit your oven.

2) Lightly grease the muffin cases with vegetable cooking oil and set aside.

3) To make the pandan juice, wash clean about 5 - 7 pandan leaves. Cut into smaller pieces, blend with about 170g water and obtain 150g pandan juice.

4) In a clean mixing bowl, place altogether the flour, eggs, coconut milk, salt and pandan juice and whisk to combine with the electric mixer.

5) Add in the vegetable cooking oil and mix till combined with a ballon whisk.

6) Pour mixture into each aluminium case. Fill the muffin cases till almost full and sprinkle some sesame seeds.

7) Bake in preheated oven 180°C for about 25 minutes.

8) Remove from oven and unmould immediately to cool.

These dainty Kueh Bakar Pandan turned out not too bad looking.  Simply love the pandan and coconut fragrance. And the next thing you know. ... they are very addictive.  Enjoy !


Saturday 17 June 2017

Coffee Walnut Streusel Cake


Have been cracking my head ... what cake to bake for Father's Day celebration at home. My hubby loves beer and coffee (well, most guys do ... don't they? hee.. hee !) ... Obviously, I can't bake a "beer cake".  He didn't like too sweet and creamy cakes either.

My previous bakes coffee walnut loaf and cranberry coconut streusel muffins. So, a simple Coffee Walnut Streusel Cake it is !

A few days ago, I baked a Coffee Cinnamon Chocolate Chips Bundt Cake for breakfast with my colleagues. A yummy recipe I tweaked from here.

Coffee Cinnamon Chocolate Chips Bundt Cake
I liked the texture and glad that it was well received by most colleagues. So I adjusted the recipe a little (cos realised didn't have any yogurt) and added streusel toppings to bake a coffee walnuts streusel cake.


Coffee Walnut Streusel Cake
Makes one 8x8-inch square pan
Ingredients (A)
113g unsalted butter, at room temperature
1/2 teaspoon salt
110g castor sugar
2 eggs, at room temperature (the size of my egg is 60g each with shell)

Ingredients (B)
1 teaspoon baking powder
180g all-purpose plain flour

Ingredients (C)
120g full cream fresh milk
2 tablespoons instant coffee mixture (dissolved 3 teaspoons Nescafe instant coffee in 2 tablespoons hot water, cooled).

Streusel ingredients (D)
45g unsalted butter, chilled and cubed
45g light muscovado sugar
45g all-purpose plain flour
1 teaspoon ground cinnamon
80g toasted walnuts, finely crushed

Method:
Preheat the oven to 170ºC. Position the rack in the middle. The temperature of the oven may vary, do adjust the temperature and timing to suit your oven.

Combine ingredients (B) in a medium bowl, sifted and set aside

Make the streusel ingredients (D) : In a large bowl, whisk together flour, light muscovado sugar, ground cinnamon and walnuts. Cut the butter into the flour mixture with either a pastry blender, your fingertips or two knives until it resembles coarse crumbs. Cover, and refrigerate until ready to use.

Line and grease the base of a 8x8-inch square cake pan with parchment paper. Lightly grease the sides with butter.

In a clean mixing bowl, beat together the butter, castor sugar, and salt until light and fluffy using an electric mixer on medium speed.

Add the eggs one at a time, beating well after each addition. Scrape down the sides and bottom of the bowl as needed.

With the mixer on low speed, add alternately the ingredients (B) flour and ingredients (C) milk & coffee. (flour mixture in three additions) and milk & coffee (in two additions) [starting and ending with the flour mixture]. Mix only until just combined.

Pour batter into the prepared pan and smooth the top with spatula. Dot or spoon the streusel evenly all over the batter top. Tap the pan lightly on a table top a few times to get rid of any trapped air bubbles in the batter.

Bake the cake in preheated 170°C oven for 40 minutes or until golden brown.
*note: you may tent it with aluminium foil if it gets browned to quickly.

To check for doneness, insert a skewer or toothpick in the center of the cake if it comes out clean with a few moist clumps clinging to it.


Let the cake cool in the pan for 10 minutes before removing top-side up, onto wire rack to cool completely.


Well, we have them warm with hot coffee!

It is a soft with tender crumbs, not too buttery cake. The streusel crumb topping is an addition ... crunchy, sugary crusty with a hint of cinnamon fragrance.

Be it a celebration cake or not, we simply enjoyed this simple cake.
Happy Father's Day to my hubby and all daddies out there !

Happy baking! Enjoy !

Sunday 11 June 2017

Lemon Chocolate Swirl Bundt Cake

Indulgence in another lovely baked bundt cake.

I wanted something lemony and chocolate flavour.  A citrus tangy and chocolate flavour all in one ! Ta da ! ... a Lemon Chocolate Swirl Bundt Cake ! The tangy aromas filled the kitchen as it baked.


Lemon Chocolate Swirl Bundt Cake
Makes one 6-cup Bundt pan or one 8-inch cake pan.
Ingredients (A)
113g unsalted butter, at room temperature
1/2 teaspoon salt
110g castor sugar
2 eggs, at room temperature (the size of my egg is 60g each with shell)
2 teaspoons lemon zest

Ingredients (B)
100g All-purpose plain flour
80g cake flour
1 teaspoon baking powder

Ingredients (C)
100g full cream fresh milk
2 tablespoons freshly squeezed lemon juice

For the chocolate batter:
1.5 tablespoons cocoa powder (I used Hershey's cocoa)
2 tablespoons hot water.

For the Icing:
3 - 4 tablespoons freshly squeezed lemon juice
100g confectioners' (powdered or icing) sugar, sifted

Method:
Preheat the oven to 170ºC. Position the rack in the middle. The temperature of the oven may vary, do adjust the temperature and timing to suit your oven.

Combine Ingredients (B) in a medium bowl, sifted and set aside

Grease the 6-cup Bundt pan lightly with some *vegetable oil using brush or with kitchen towel, set aside.
(*or well-greased with butter and lightly flour)

In a small cup or bowl, mix the cocoa powder with hot water and set aside.

In a clean mixing bowl beat together the butter, castor sugar, and salt until light and fluffy using an electric mixer on medium speed.

Add the eggs one at a time, beating well after each addition. Scrape down the sides and bottom of the bowl as needed.

With the mixer on low speed, add alternately the ingredients (B) & (C) starting with B (flour mixture in three additions) and milk + lemon juice (in two additions) [starting and ending with the flour mixture]. Mix well until just combined for each addition.
Lastly, stir in the lemon zest till just incorporated into the batter.

Scoop about 1/3 lemon batter to a bowl, mix in the cocoa mixture well with a spatula.

Pour half the lemon batter into bundt pan and smooth the top. Next, spoon all the chocolate batter. Spoon the remaining lemon batter and level the top with a spatula. Tap the pan lightly on a table top a few times to get rid of any trapped air bubbles in the batter.

Bake the cake in preheated 170°C oven for 40 to 45 minutes.  Check for doneness, insert a skewer in the center if it comes out clean with a few moist clumps clinging to it. Do not over bake else it will be dry.


Let the cake cool in the pan for about 10 - 15 minutes and then invert onto a rack to cool completely. Once cooled, carefully lift the cake onto a serving dish or platter.


Once the cake is completely cooled, make the icing.
In a bowl, combine the sifted confectioners' sugar with the lemon juice. Stirring and mixing constantly with a spoon. Start with 2 tablespoons of lemon juice. Adjust the consistency to your preference by adding more lemon juice or confectioners' sugar accordingly.

Use a spoon to drizzle the icing over the top of the cake and allow it to fall down the sides. Let the icing set for a couple of minutes before slicing the cake.

Let the icing dry before covering and storing.


Beautifully browned !


Love the texture ... like a light pound cake not too dry or too dense.

Love this simple yet gorgeous lemony chocolate flavour cake with fine tender crumbs.

Enjoy our weekend afternoon break with a slice of lemony and chocolate swirl flavour cake. Perfect with a cup of warm honey lemon tea.

Happy Baking!

My modifications made from recipe source : King Arthur Flour

Sunday 4 June 2017

Chocolate Yogurt Bundt Cake

Oh gosh ! I've been craving for chocolate cake again. And I wanted something rich, moist and chocolatey.
Even better to just use one bowl for mixing the ingredients and one baking pan with minimal washing (lazy me ...) No electric mixer is required. Well, glad that this easy fool-proof, guaranteed recipe that put a big smile on all our faces.

Moist, full of deep chocolate flavor, a bundt cake somewhat resembles fudgey brownie. Yes my big kids love chocolatey cakes too!


Recipe adapted from:Beyond Kimchee
Below my slightly adjusted version to suit my 6-cup Bundt pan.

Chocolate Yogurt Bundt Cake
Makes one 6-cup Bundt pan or one 7 inch round pan.
Ingredients
(A)
113g unsalted butter
15g cocoa powder (I used Hershey's cocoa)
1/2 teaspoon salt
120g water

(B)
126g cake flour
120g castor sugar
1/2 teaspoon baking soda

1 egg
60g plain Greek yogurt
1 teaspoon vanilla extract

Method
Preheat the oven to 170ºC. Position the rack in the middle. The temperature of the oven may vary, do adjust the temperature and timing to suit your oven.

Grease the 6-cup Bundt pan lightly with some *vegetable cooking oil using a brush or with kitchen towel, set aside.
(*or well-greased with softened butter and lightly flour)

In a small saucepan combine Ingredients (A) and place over medium heat. Cooking and stirring with a spatula until melted and combined. Careful don't let the mixture come to a boil. Remove the saucepan from the heat and set aside.

Combine and mix well Ingredients (B) with a balloon whisk in a big bowl, set aside.

Pour half of the melted cocoa butter mixture to (B) and whisk until incorporated and blended. The mixture will be thick. Add the remaining cocoa butter mixture and whisk until combined. Next add the egg, whisking until completely blended. Whisk in the yogurt and the vanilla extract until smooth.

Pour batter into the prepared pan. The batter is runny. Bake in preheated oven at 170°C for about 35 - 40 minutes. (Mine was baked at 35 minutes and I tent with an aluminium foil in the last 10 minutes of baking). Check for doneness, insert a skewer in the center if it comes out clean with a few moist clumps clinging to it. Do not over bake else it will be dry.


Let the cake cool in the pan for 15 minutes and then invert onto a rack to cool completely. Then carefully lift the cake onto a serving dish or platter.

For the chocolate glaze
Ingredients :
100g Dark chocolate, break or chopped coarsely
100g heavy cream
1 tablespoon sugar (you may increase the amount if prefer it sweeter).

Method:
To make the glaze, combine the heavy cream and sugar in a small saucepan and boil over medium heat. Stirring occasionally with a big metal spoon or whisk until the sugar is dissolved. The cream should be hot but not over boiled.

Off the heat and remove the saucepan. Add the chopped chocolate to the hot cream and whisk until smooth.

Let the mixture cool down for about 5 minutes until it is slightly thickened.
Use a spoon to drizzle the glaze over the cake and allow it to fall down the sides. Let the ganache set for about 5 minutes before slicing the cake.

Served with some ice cream and a glass of cold milk if you like. But for me ... simply indulge this heavenly rich, moist, delicious and chocolatey cake with a cup of 'kopi kosong' ... black coffee without sugar on a sunny afternoon!


Enjoy & Happy Baking!

Sunday 28 May 2017

Gula Melaka Butter Cake


Ever since using palm sugar, also known as Gula Melaka in baking Ondeh Ondeh Cupcake and the recent Banana Gula Melaka Sponge Cake, somehow, we have fallen in love with this fragrant caramel-like taste in our cakes.

Have bookmarked this recipe for the longest time. As my mother in-law likes butter cake, baked a fragrance butter cake to celebrate Mother's Day together earlier this month.


Recipe adapted from: Victoria Bakes
My slight adjustments made below
Gula Melaka Butter Cake
One 8x8 inch square pan
Ingredients
A
200g chopped gula melaka
100ml coconut milk
2 - 3 pieces of pandan leaves, washed clean and tie a knot

B
250g salted butter, room temperature
40g Light Muscovado sugar

C
5 eggs (the size of my egg is 60g each with shell)

D
200g cake flour
5g baking powder
1/8 tsp baking soda
20g coconut cream powder

Method :
1) Place ingredients A in a small saucepan, cook on low heat for about 8 - 10 minutes till palm sugar dissolved. Stirring occasionally to make sure nothing sticks to the bottom of the pan. Off the heat and discard the pandan leave. Set aside to cool.

2) Preheat the oven to 170ºC. Position the rack in the middle. The temperature of the oven may vary, do adjust the temperature and timing to suit your oven.

3) Combine ingredients D in a medium bowl, sift and set aside.

4) Grease and line one 8 × 8 inch square baking tray with parchment paper. Set aside.

5) Beat ingredients B until light and fluffy with electric stand mixer (about 2 - 3 mins). Scrape down bowl with rubber spatula, then add ingredients C, one at a time, beating well after each addition. Scrape down the sides of the bowl as needed.

6) With the mixer on low speed, add alternately the ingredients A & D, starting with D (flour mixture in three additions) and gula melaka mixture (in two additions) [starting and ending with the flour mixture]. Mix only until combined.

7) Scrape the batter into the prepared pan, level the top with spatula and bake in preheated oven at 170°C for about 40 - 50 minutes. (Mine was done at 43 mins. and tent with an aluminium foil in the last 10 minutes of baking). Check for doneness, insert a toothpick in the center if it comes out clean.

8) Removed cake pan from oven and let rest for a few minutes in the pan before carefully transferring onto a wire rack to cool completely.


I have a little leftover whipped cream in the freezer and gula melaka coconut filling from making Odeh Odeh. Cut two mini cakes and frost them with some whipped cream and a few spoonfuls of gula melaka coconut. Indulge myself with one and the other piece for my mother in-law.  Blessed Mother's Day :)
Enjoyed our afternoon coffee break with a big slice of buttery cake that's filled with the richness of palm and coconut fragrance!

Happy Baking!

Wednesday 24 May 2017

Crisp Salted Oatmeal White Chocolate Cookies

Baked another batch of cookies for the "Mr or Ms Cookie Monster" ! hee.. hee.. ! This time with some salt flakes on the cookies.

The salt flakes complement the crisp oatmeal and sweet white chocolate in these cookies. Love the crisp of the outer rims with chocolate bits in the middle and a hint of salty flavour.


Recipe source:Smitten Kitchen
Below my slight adjustment made as halved the recipe.
Crisp Salted Oatmeal White Chocolate Cookies
Makes about 12 big cookies
Ingredients
(A)
65g all-purpose flour
1/4 teaspoon baking powder
1/4 teaspoon baking soda

(B)
100g rolled oats
60g white chocolate bar, break or chop into small pieces.

90g salted butter, slightly softened
60g caster sugar
15g light muscovado sugar
1 egg
1 teaspoon vanilla extract

1/2 teapoon flaky sea salt (for sprinkling cookie top)

Method:
1. Preheat oven to 180°C and position the rack in center of oven. (*the oven temperature may vary, do adjust accordingly).  Line baking sheets with parchment paper. (do not need to grease).

2. Combine the ingredients (A) in a medium bowl and set aside.

3. In the bowl of your electric stand mixer (or handheld mixer), cream the butter till fluffy and add in the sugars in 3 separate additions. Beat until smooth. Scrape down the bowl occasionally. Add the egg and vanilla extract, beat till incorporated.

4. Add ingredients (A) and mix until just incorporated and smooth. Take bowl off mixer, fold in the ingredients (B) and mixing just enough to evenly combine with a spatula or a big spoon.

5. Drop by rounded 2 tablespoonful  of dough onto the prepared baking sheet. Place 2.5 inches apart as the cookies spread as they bake. Press to flatten the dough slightly and sprinkle a little of salt flakes on each cookie.

6. Bake in preheated oven at 180°C about 13 to 16 minutes or until cookies are deep golden brown.
Spreaded big
7. Remove the baking sheet from oven and let rest for 5 minutes. Remove the cookies from the baking sheet and cool completely on a wire rack before storing them in airtight container.


My  way of of enjoying these cookies ... with cuppa of warm honey lemon tea !

Happy Baking !

Sunday 21 May 2017

Japanese Cheesecake

Oh NO ! .... It has a sexy waistline :(


Although I've baked mini cheese cupcakes here & here, this is the first time I'd tried a souffle Japanese Cheesecake ... in an 7-inch round pan.

Mom: Help ! Boy ! Quick, come and help me!
Boy: Why ?! Are you hurt?
Mom: Nope. I need another pair of hands to help me lift this cake up ... by holding the 2 strips of parchment paper. Ok at the count of 3, let's lift the cake up!
Boy: Aiyoh !

Well, I couldn't lift the 4 strips of parchment paper with one pair of hands. But I liked this brilliant idea .... this way I will not be restricted to use springform pan and worry about water seepage issue during water bath.

Oh ! Gosh ! It has a sexy waistline :( 
And suffered great shrinkage :(

A failed cheesecake that I've baked ! Nonetheless the texture is light, souffle soft and melt in the mouth kind. My big boy (actually a young man who has just turned 21 years old) couldn't stop giving praises to this Japanese Cheesecake! Both my big kids simply loved this not too dense but light & soft cheesecake. As for me ... not a fan of cheesecake though but gobbled up 2 slices ... no, should be 2 big wedges at one go !


Recipe adapted from:Just One Cookbook
Ingredients :
4 egg yolks
200g cream cheese, cut into cubes
40g unsalted butter, cut into cubes
132g whipping cream
40g caster sugar

50g cake flour, sifted
1 tablespoon lemon juice + 1 teaspoon zest

For the meringue
4 egg whites
60g caster sugar

Method :
1) One 7-inch round baking pan (fixed base)

2) Grease the bottom and the side of the cake pan with some butter.  Cut 2 long strips of parchment paper to act as "straps" (roughly size 4 x 70 cm or enough overhang for easy lifting and "transporting" the cake). Grease with some butter and place the 2 "straps" criss-cross on the bottom of the pan. Grease and line a round parchment paper for the base, and sides of the pan. Set aside.

3) Separate the eggs into yolks and whites. (the size of my egg is 60g each with shell)

4) On the stove, half-fill a cooking pot with water and bring to a simmer. Melt the butter, cream cheese with whipping cream and caster sugar in a heatproof bowl set over a pot of simmering water. Make sure the water doesn't touch the bottom of the bowl. Stir the mixture occasionally with spatula till melted and smooth. Once they are melted, use a ballon whisk to blend everything together. Remove from flame and leave to cool slightly.

5) Preheat the oven to 170°C, position the rack on the lowest.  Fill a larger baking pan with hot water, about half-way or 1-inch water level.

6) Add the egg yolk one at a time to the warm cream cheese mixture with a ballon whisk. Mix well before adding the next one.

7) Add and whisk in the cake flour into the cream cheese mixture. Strain the mixture through mesh strainer. Mix in the lemon zest and lemon juice. Whisk well to blend and set aside.


8) In a clean mixing bowl, whisk the cold egg whites till foamy using the handheld electric mixer. Gradually add in caster sugar in 3 separate additions and beat till soft/medium peak.

9) Using a balloon whisk, gently fold 1/3 of the meringue to the cream cheese mixture until incorporated. Fold in another 1/3 into the mixture. Finally, pour cream cheese mixture into the bowl of remaining meringue and fold in gently until incorporated.

10) Pour the mixture all at once but slowly into the prepared cake pan. This is to let the big air bubbles burst as batter flows out of mixing bowl. Lightly tap the pan 3- 4 times on a table top to get rid of any trapped air bubbles in the batter.

11) Put the pan into the larger baking pan which is filled with hot water. Reduce the oven temperature to 160°C and bake for 55 minutes. {I tent the top with foil in the last 10 minutes of baking}

Reduce the oven temperature to 150°C and bake for another 10 minutes, or until the top is golden brown and skewer inserted comes out clean.

12) Turn off the oven and open the door of the oven slightly for 15 - 20 minutes for cake to cool inside.


13) Remove the cake pan from the oven. Gently pull out the cake using the 2 parchment paper straps (with another set of hands).  Let cool to room temperature. Chill the cake for 1-2 hours before serving.


Enjoy & Happy Baking !

Sunday 14 May 2017

White & Dark Chocolate Macadamia Nut Cookies

My big kids are definitely "Mr or Ms Cookie Monster" ! hee.. hee.. !
They love all kinds of cookies ... from the copycat Famous Amos double chocolate chips cookiesEarl Grey shortbread stamped cookiesCranberry Pecan Oatmeal cookies to Chocolate chunk cookies (just to name a few) ... they will never say NO to cookies . Especially the ones with lightly browned crispy edge with soft and chewy center. Yes, they love chewy soft nutty chocolate chips cookies.

A pack of semi-sweet chocolate chips has been idling in the refrigerator for some time. My big boy has been asking what am I gonna do with the chocolate chips. He even hinted that I have not baked him his favourite chocolate chips cookies for quite some time.

So ! here you go ... have some freshly baked White & Dark Chocolate Macadamia Nut Cookies !


Recipe adapted from: Simply Recipes
My slight adjustments made below:
White & Dark Chocolate Macadamia Nut Cookies
Makes about 1 dozen cookies
Ingredients
(A)
160g all-purpose plain flour
1/4 teaspoon salt
1/2 teaspoon baking powder

(B)
112g unsalted butter, at room temperature
70g caster sugar
60g Muscovado sugar
1 egg
1 teaspoon vanilla extract
1/2 teaspoon instant coffee powder

(C)
100g Macadamia nuts, chopped.
75g white + dark chocolate chips (a combination of dark semi-sweet chocolate chips & white mini chocolate chips)

Method :
1) Preheat oven to 180°C and position the rack in center of oven. (*the oven temperature may vary, do adjust accordingly).  Line baking sheets with parchment paper. (do not need to grease).

2) Combine the flour, baking powder, and salt in a medium bowl and set aside.

3) In the bowl of your electric stand mixer (or handheld mixer), cream the butter till fluffy and add in the sugars in 3 separate additions. Beat until smooth. Scrape down the bowl occasionally. Add the egg, vanilla extract and coffee powder.

4) Gradually add flour mixture (A) in 3 separate additions and cream till combine. Take bowl off mixer, fold in the ingredients (C) and mixing just enough to evenly combine with a spatula or a big spoon.

5) Drop spoonful of mixture on the baking sheets. Place 2 inches apart as the cookies spread as they bake. (*to minimise the cookies from spreading & flattened too much when baking, I freeze the tray of cookie dough for about 2 - 3 mins before sending it to oven)

6) Bake for 9 - 11 minutes in preheated oven at 180°C or until the edges are nicely browned and the center is just barely cooked.
(Don't bake the cookies to a crisp as they are meant to be soft and chewy )

7) Remove the baking sheet from oven and let rest for 5 minutes. Remove the cookies from the baking sheet and cool completely on a wire rack before storing them in airtight container.


Happy baking and have a wonderful weekend !