Wednesday 27 May 2015

Peach Rose Tarts

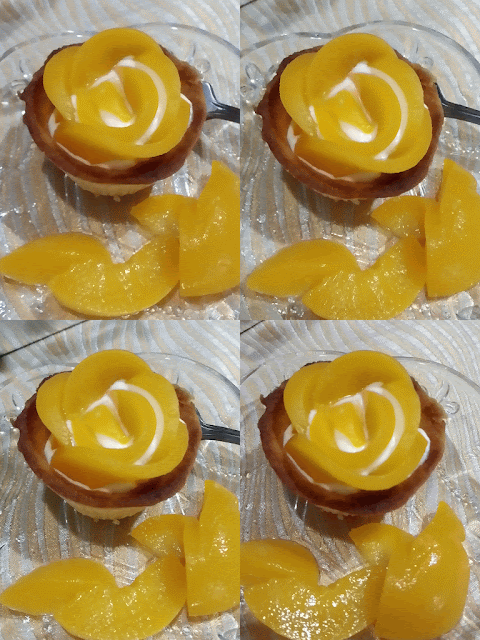
In my last BFF baking session cum gathering with my baking "kakis" (good friends), we used puff pastry to make the easy yet pretty looking Apple Rose Tarts together. One of my friends asked if we could use other fruits like peach to make like rose tarts.  I'm not sure if using the puff pastry sheet to roll the peach slices is "do-able" since we do not have any fresh or canned peach on hand. Well, it thus gave me the idea to make peach rose tarts.  I've made mini fruit tarts before, so tried out shaping the peach slices like rose.  Hee ... hee .. quite difficult to assemble the peach slices as slippery to pick and hold even I've pat them dry. I tried using chopsticks to pick but failed too.  Anyway, at last managed to shape them look abit like roses ^-^ 


For the tart crust and cream cheese filling, I used the recipes adapted from Joy of Baking : Shortbread Tarts & Cream Cheese Filling
As my big kids love cream cheese, I added more and reduced the whipped cream slightly.
Below my version with slight changes made to quantity and baked as mini tarts using aluminium foil cups.

Peach Rose Tarts
(Yields 14 small tarts in aluminium foil cups)

Ingredient for Shortbread Tarts:
227 grams unsalted butter, room temperature
50 grams confectioners (powdered or icing) sugar
200 grams all-purpose flour
1 teaspoon vanilla extract
1.5 tablespoon corn flour
Pinch of salt

Method :

1) In a mixing bowl, use electric mixer to beat the butter and sugar together (1 -2 minutes) until smooth.

2) Beat in the vanilla extract.  Followed by the flour, corn flour and salt and mix just until incorporated. Lightly knead to shape the dough to form a ball with hand.  (If the shortbread dough is too soft to roll into balls, cover and refrigerate for about 30-60 minutes).
3) Preheat the oven to 180 degrees C. Place rack in center of oven.

4) Divide and weigh dough into smaller balls. {25g each for aluminium foil cup} Fill dough into foil cup. With your fingertips, press the dough onto the bottom and up the sides of the individual aluminium foil cup. Rest about 5 mins before tidying the edge with a knife or scrapper.  Lightly prick bottom of pastry crust with the tines of a small fork (this will prevent the dough from puffing up as it bakes).


5) Once filled, put all the unbaked shells onto baking sheet/tray and bake for about 20 minutes or until the crust dry and lightly golden brown.
6) Remove from oven and place on a wire rack to cool completely.

Ingredients for the Cream Filling:
80 ml whipping cream
170g Light cream cheese (soften it or cut into smaller pieces if straight from the fridge)
1 tablespoon confectioners (powdered or icing) sugar
1 tablespoon lemon juice
1/2 teaspoon vanilla extract

Topping:
1 small can of Peach.  Rinse the peaches with water, drained and slice the peaches thinly and pat dry with kitchen towel.
*note: the peaches are soaked in heavy syrup, a rinse with water makes them slightly easier to handle.

Use electric mixer to beat the whipping cream in medium-high speed (about 3 minutes).

Add in the sugar and vanilla extract.  Followed by the cream cheese and lemon juice, mix just until soft peaks form.  Spoon the filling into a piping bag. (omit this step if you prefer using a spoon to scoop the filling onto the crust).

To assemble the mini Peach Rose Tarts: 
1. Once the mini crusts are cool, pipe the cream cheese filling onto the crust.
2. Arrange the slices of peach slice by slice, starts from the center, making them to form like a rose shape.
3. Place the tarts in air-tight container with cover, refrigerate the tarts for a few hours before enjoying them.

Well, obviously they couldn't wait to try them for supper though I made these sweet treats for our dessert the next day.
  Do they look like lovely yellow roses ?
At least my big boy said "Pretty, like flower"
Have a sweet lovely day :D 


I'm submitting this post to the Best Recipes for Everyone May 2015 Event (Theme: My Favourite Desserts) organized by Fion of XuanHom's Mom and co-hosted by Aunty Young. 


Monday 25 May 2015

Nigella's Mother-In-Law's Madeira Cake : Bake-Along #79

I had a fun gathering cum baking session with my baking friends on last Saturday. We made some lovely Apple Rose tarts and a chiffon cake that we had chosen for our gathering.

And here, I'm having another round of 'Bake-Along' with all the wonderful ladies in this Bake-Along #79 - My Mother-In-Law's Madeira Cake (Nigella Lawson)


As I was about to prepare the ingredients, I realised that I didn't have the appropriate size aluminium loaf pan. Since I've baked small mini cakes using the square shape muffin pan, think it should be 'do-able' ....

My Mother-In-Law's Madeira Cake
Recipe adapted from Nigella Lawson

I used one third of the recipe to bake in 6 square shape muffin pan. When I read that Joyce added some rum, I added Grand Marnier since I've got a bottle.
My modifications made in blue below.

Ingredients
240 grams unsalted butter (softened) 80 grams 
200 grams caster sugar (plus extra for sprinkling) 65 grams, reserved 1 tablespoon for sprinkling
grated zest and juice of 1 unwaxed lemon 1/2
3 large eggs 1 egg
210 grams self-raising flour 70 grams
90 grams plain flour 30 grams 
2 teaspoon of Grand Marnier my addition 

Method:
You will need a loaf tin (23 x 13 x 7cm / 9 x 5 x 3 inches), buttered and lined.
I used a square muffin pan, greased with butter, makes 6 mini cakes.

1. Preheat the oven to 170ºC

2. Cream the butter and sugar, and add the lemon zest.

3. Add the egg one at a time with a tablespoon of the flour for each.

4. Then gently mix in the rest of the flour and, finally, the lemon juice and my addition of Grand Marnier.

5. Sprinkle with caster sugar (about 2 tablespoons should do it) as it goes into the oven, and bake for 1 hour or until a cake-tester comes out clean.
(Spoon the mixture evenly among the muffin cups and smooth the surface. I used 1 tablespoon of caster sugar to sprinkle onto the 6 batter, baked for 25 minutes).


6. Remove to a wire rack, and let cool in the tin before turning out.


Realised that the amount of Grand Marnier is too little to be detected. I'm surprised that it's texture is light and not too buttery. Love the fragrance of the lemon and tangy tender crumbs.  Oh Yes! I agree with Zoe ... really 'yummy because of its sugary crusty topping' when I took my first bite of the cake. And well, it seemed to have 'character' as commented by Lena 'a crispy top which gives the cake a bit of 'character'

Enjoy & Happy Baking!

I'm submitting this post to 
Bake-Along #79 : Mother-In-Law's Madeira Cake
Hosted by ZoeLena & Joyce


Friday 22 May 2015

Blueberry and Apple Jelly & Strawberry Yogurt Sauce

 Let's have a toast, shall we ?!


My girl couldn't join her brother to cook a dish on Mother's Day.  So, as soon as her mid term exams ended, my girl borrowed a cookbook from the library and wanted to cook for the family. So call a dinner for the belated Mother's Day celebration. She bookmarked a few recipes but unfortunately she was unwell that weekend so shelved it off.

As I was flipping through the pages of the cookbook, saw this easy yet creative dessert. Here's sharing this 'not drinkable champagne' ... or rather Blueberry and Apple Jelly !


Recipe adapted from the cookbook :
LOW CARB REVOLUTION
Comfort Eating For Health By Annie Bell
With slight modification made as I've halved the quantity, replaced the gelatine leaves with gelatine powder.

Blueberry and Apple Jelly
Serves 4
Ingredients :
1/2 litre clear unsweetened apple juice
6 gram gelatine powder
100 gram blueberries
seeds from pomegranate to serve (optional)

Method :
Spoon 2 tablespoons of apple juice to a small bowl and sprinkle with gelatine. Stir to dissolve with a spoon. Set aside for about 3 minutes.

Pour the rest of the apple juice into a small pot. Use medium flame to boil.

Once boiled, off the flame. Pour the gelatine mixture into the pot, stir to dissolve completely. Leave to cool. (I leave about 5 minutes).

Pour the jelly solution into containers, glasses or serving bowls.

Stir in the blueberries which will float. Cover and chill for half a day or overnight in the fridge till set. Serve the jelly scattered with pomegranate seeds if wished.

Strawberry & Yogurt Sauce 

Since we also love the Mango & Yogurt Sauce here, I adapted the same recipe to make a small portion but using strawberries instead of mangoes and made slight changes.

For the fruits:
6 Strawberries - hulled and cut in halves
2 fresh Plum - stoned and pitted. Slice 12 wedges.
Instead of using skewers to make fruit kebabs, I used toothpick to secure them in pairs.

For the sauce:
80ml fresh strawberry  puree - remove the hull and discard, chopped small and lightly mashed with fork.
80ml thick plain yogurt (I used low-fat yogurt natural flavour)
Few drops of vanilla essence

1. To make the sauce, beat together the strawberry puree, yogurt and vanilla with an electric mixer.

2. Cover the sauce and place in the fridge until required.

3. Decorate and arrange the fruits on a serving tray/plate and serve together with a bowl of strawberry yogurt sauce.


Hee ... hee .. Do they look like glasses of champagne? So, here's a toast to the organisers & hosts of below theme events, cheers ^-^! And thank you for hosting the events !

"This post is linked to the event Little Thumbs Up (May 2015: YOGURT) organised by Zoe of Bake for Happy Kids and Doreen of My Little Favourite DIY, and hosted by Cheryl of Baking Taitai
 

Also

I'm submitting this post to the Best Recipes for Everyone May 2015 Event (Theme: My Favourite Desserts) organized by Fion of XuanHom's Mom and co-hosted by Aunty Young. 


And sharing with "Cook Your Books Event"

Cook-Your-Books

I'm submitting this post to Cook Your Books Event #23 [May 2015] hosted by Joyce of Kitchen Flavours

Friday 15 May 2015

Fruit Kebabs with Mango and Yogurt Sauce

These mixed fresh fruit kebabs make an attractive and healthy dessert.  I supposed this is quite similar to fruit Fondue but served cold and healthier using yogurt sauce instead of rich chocolate sauce.  (good for a "weight-watcher" like me ... hee.. hee)

Pretty simple and easy to make ... so colourful, appetizing and attractive to guests if you're having some fun fruity party.


Recipe adapted from the cookbook "Desserts All Around The Year" by Martha Day.

Fruit Kebabs with Mango and Yogurt Sauce
Serves 4
120g Strawberries - hulled and cut in halves for bigger ones
2 large Bananas - cut bite-sized
1/2 Mango - peeled, stoned and cubed
2 Kiwi Fruit - peeled and cubed

(Feel free to adjust the quantity and to use your preferred fruits to make your kebabs : pineapple, apple, papaya, star-fruit etc.)

For the sauce
120ml fresh mango puree - peeled and pitted mango
120ml thick plain yogurt  (I used low-fat yogurt mango & peach flavour)
1 teaspoon caster sugar
Few drops of vanilla essence
1 teaspoon finely chopped mint leaves (omitted as don't have any in the fridge)


Method :
1. To make the sauce, beat together the mango puree, yogurt, sugar and vanilla with an electric mixer.

2. Stir in the chopped mint. Cover the sauce and place in the fridge until required.

3. Thread the prepared fruit on a 6 inch wooden skewers,  alternating the fruits.

4. Arrange the kebabs on a large serving tray with the mango and yogurt sauce in the center.


Well, this is so refreshing and fun dipping with the sauce. They liked it so much that we had another round the next day since we still have the fruits. But I only threaded half the quantity with skewers as they couldn't wait for all the fruit skewers to be completed  .... they just scooped the sauce onto the cut fruits and munch ... lol ^-^!

Enjoy ! Have a fun dipping fruity day and a great weekend !

"This post is linked to the event Little Thumbs Up (May 2015: YOGURT) organised by Zoe of Bake for Happy Kids and Doreen of My Little Favourite DIY, and hosted by Cheryl of Baking Taitai
 

And

I'm submitting this post to the Best Recipes for Everyone May 2015 Event (Theme: My Favourite Desserts) organized by Fion of XuanHom's Mom and co-hosted by Aunty Young. 

Wednesday 13 May 2015

No-Bake Oreo Cheesecake Cupcake

Haiz ! unbearably hot ! Looks like this cheesecake cupcake is going to melt ... hee hee !


After baking a batch of Red White and Blueberry Cheesecake, I left with about 140g of cream cheese in the fridge.  Saw 3 small packs of mini Oreo cookies on the dining table, GREAT ! Just in time to make NO BAKE Oreo cheesecake. The reason why I didn't want to bake .... cos the weather is Scorching Hot lately ! Lol ! Anyway, I quickly took out the bookmarked easy no-bake oreo cheesecake recipe. Decided to forgo the topping as I don’t have enough Oreo cookies.

As I was making the crushed Oreo, I smelled coconut fragrant.  Took a closer look at the wrapper .... printed "coconut delight Oreo"!! Gosh ! I wondered if I should add some dessicated coconut to the recipe ?!!! Anyway, I'm not sure who had bought these new flavour which made me mistaken for the usual normal Oreo >~< ! Blame it on the hot and humid weather here that made me grouchy, groggy and inattentive :(

Recipe adapted from Eugenie Kitchen
Below my slightly modified version as I've reduced the amount of icing sugar and added more lemon juice.

No-Bake Oreo Cheesecake Cupcake
Yields: 6 cupcakes

Ingredients
For crust
6 Oreo slice cookie (without cream)

For filling
140g low-fat cream cheese, softened
120ml whipping cream, whipped
40g icing sugar
4 Oreo cookies (crushed briefly)
2 teaspoons lemon juice

Method
1. Line cupcake pan with liners. Place an Oreo slice cookie (without cream) each at the bottom of each liner.

2. Beat the whipping cream until soft peak. And set aside.

3. In a bowl add in cream cheese, icing sugar and lemon juice. Lemon juice is added because: the acid thickens the filling and it tastes better. Stir until well combined. Add in whipped cream and whisk until same consistency and well mixed.

4. Finally add in crushed Oreos and lightly stir to combine.

5. Fill each cupcake liner with the batter, using an ice cream scoop. And with the back of a spoon, press a little and make the top smooth. Chill them in the refrigerator overnight.


Taste good although it looked slightly ugly ... :)

My girl said it tasted "weird" ...

The texture is creamy soft yet not too dense ... with an unexpected tweak of sweet fragrance coconut delight and lemony taste. I like it !
My big boy liked it too ^-^! He gave a big thumbs up !

Celebrating together with our wonderful Bake-Along buddies in Bake-Along 4th Anniversary, here's my 2nd batch of easy no-bake Oreo Cheesecake Cupcakes. Submitting to the Bake-Along #78 Theme Cheesecake ^-^
♡♡Happy Birthday♡♡

Linking this post to Bake-Along event, hosted by JoyceLena & Zoe.


Bake-Along #78 : Bake-Along 4th Anniversary Theme - Cheesecake 


And

Linking this post to the Best Recipes for Everyone May 2015 Event (Theme: My Favourite Desserts) organized by Fion of XuanHom's Mom and co-hosted by Aunty Young.

Tuesday 12 May 2015

Mini Napoleans & Apple Rose Tarts


Pastries are so versatile that they can be served as breakfast, afternoon snacks or desserts.

My parents in-law popped in for a visit and a weekend stay-over with us. Since I've a pack of store bought frozen puff pastry sheets, why not make some pastries for our tea/coffee break.

Well, I've got some apples, strawberries, blueberries and whipped cream .... how about Mille-Feuille ! Yes !  ... and some lovely Apple Rose Tarts ^-^!

Made a few mini heart-shaped Mille-Feuille or commonly referred as Napoleans. Used whipped cream with some strawberries and blueberries for the fillings.
Refer the my previous attempt in Mille Feuille

I remembered I've bookmarked the lovely Apple Rose Tarts that Lian of Cook Loves God shared in LTU theme Apple. Really wanted to try making some pretty edible roses ... (and to impress my MIL ... hee.. hee!)

Since I'm using the ready frozen puff pastry, below my slight modification made.

Apple Rose Tarts
Ingredients :
1 sheet puff pastry
1 red apple
2 tbsp sugar
1 tbsp honey
3 tbsp water

Honey
Ground cinnamon and icing sugar for dusting
6 cupcake cases

Method :
1. Cored and slice the apple thinly. Put in the pot with sugar, honey and water and cook for about 3 to 4 minutes till softened. Drained and cool the apple slices.

2. Preheat oven to 180°C

3. Thaw the puff pastry sheet on the lightly floured surface.

4. Cut into 6 strips.

5. Place about 6 - 8 apples slices on each strip. Roll from one end to the other. Place them individually in cupcake cases.

6. Bake for 25 minutes.
(The temperature of the oven may vary, do adjust accordingly.)

7. Lightly brush with honey and dust some icing sugar and ground cinnamon.

Please follow the steps in the video link


https://youtu.be/NgetvGCoEFQ

Tada! ... Here's some lovely sweet pastries for our tea/coffee break. Enjoy !


☆☆☆♡☆☆☆♡☆☆☆

Linking this post to the Best Recipes for Everyone May 2015 Event (Theme: My Favourite Desserts) organized by Fion of XuanHom's Mom and co-hosted by Aunty Young.


Monday 11 May 2015

Brazilian Coffee Bananas

My big kids enjoy yogurt with some added fresh fruits or berries. This yogurt dessert is so easy to prepare .... just nice to be served right after our dinner ^-^!


Recipe adapted from the cookbook "Desserts All Around The Year" by Martha Day.

Brazilian Coffee Bananas
Serves 2
Ingredients :
2 small ripe bananas
1 teaspoon instant coffee granules or powder
1 tablespoon muscovado sugar
140g Greek-style yogurt (I used low-fat natural yogurt)
1 tablespoon flaked almonds (lightly toasted)

Method :
1) Peel and slice one banana and mash the remaining with a fork.

2) Dissolve the coffee in 1 tablespoon of hot water and stir into the mashed bananas.

3) Spoon a little of the mashed bananas mixture into 2 serving dishes and sprinkle with sugar. Top with a spoonful of yogurt, then repeat until all the ingredients are used up.

4) Swirl the last layer of yogurt for a marbled effect. Finish with a few banana slices and flaked almonds. Serve cold. Best eaten within about an hour of making.


Yummy ... Not too heavy for our after meal dessert. Relax and enjoy a bowl of light and smooth yogurt dessert with a hint of coffee flavour. :D

Linking another Yogurt post to the event " Little Thumbs Up (May 2015: YOGURT) organised by Zoe of Bake for Happy Kids and Doreen of My Little Favourite DIY, and hosted by Cheryl of Baking Taitai


And


I'm submitting this post to the Best Recipes for Everyone May 2015 Event (Theme: My Favourite Desserts) organized by Fion of XuanHom's Mom and co-hosted by Aunty Young. 

Saturday 9 May 2015

Red, White and Blueberry Cheesecake


My big kids love cheesecakes , chocolatey chocolate cakes, tiramisu, fudgy brownies etc. So I'll bake/make some of these 'sinful sweet treats' once in a blue moon and on rare occasions ... just for my 'know-how' to bake these sweet treats and to 'please' their request.

I've made them non-bake cheesecake Eggless non-bake Cheesecake.  Of course, they have asked when will I bake them cheesecake (cos they knew mom is not very fond of cheese and can't bake cheesecake hee .. hee).

I've missed a few bake-along sessions with my cyber blogger pals. Here's sharing this creamy yet light and low-fat baked mini cheesecake in this Bake-Along #78 - theme cheesecake.


Recipe adapted from:
Skinny Taste

Below my slightly modified version and I've halved the recipe to bake 6 cupcakes.

Red, White and Blueberry Cheesecake Cupcakes
Ingredients:
6 wafer crackers
110g less fat cream cheese, softened
20g caster sugar
1 tsp vanilla
85g low-fat natural yogurt
1 egg white
1.5 teaspoon all purpose flour

Some strawberries, hulled and sliced thin
Some blueberries

Directions:
Preheat oven to 177°C.

Some prepared ingredients 


Line cupcake tin with liners. Place a wafer cracker at the bottom of each liner.

Gently beat cream cheese, sugar and vanilla until smooth using an electric mixer. Gradually beat in yogurt, egg white, and flour. Do not over beat. Pour into cupcake liners filling half way.

Bake 20 to 25 minutes or until center is almost set. Cool to room temperature then chill at least 1 hour in the refrigerator.


Before serving, top with some fresh strawberries and blueberries.

My big boy had two at one go ... he claimed very nice.
My girl enjoyed it but very disciplined to just one cupcake.
My mother in-law ate one and commented it tasted very nice.

While I definitely need to try one ...hmm.. creamy yet light and not too cheesy. It's soft texture with berries tasted wonderful good!
But if you're looking for the dense and rich classic New York style cheesecake with a graham cracker crust and high sides ... this is not that kind of cheesecake.

My big boy gladly finished the balance of one cheesecake cupcake the next day.

Taking this opportunity to wish all lovely & wonderful mothers :
♡♡A Blessed Happy Mother's Day
With love, hugs and gratefulness♡♡
♡♡祝天下的妈妈“母亲节快乐”♡♡


Happy Birthday!
Happy Bake-Along 4th Anniversary ! 

Linking this post to Bake-Along event, hosted by JoyceLena & Zoe.


Bake-Along #78 : Bake-Along 4th Anniversary Theme - Cheesecake 


And

This post is linked to the event, Little Thumbs up organised by Doreen from my little favourite DIY and Zoe from  Bake for Happy Kids, hosted by Cheryl from Baking Taitai at this post.


Also
Linking to the Best Recipes for Everyone May 2015 Event (Theme: My Favourite Desserts) organized by Fion of XuanHom's Mom and co-hosted by Aunty Young.